Arms Warrior in WoW: The Burning Crusade (TBC) PvP is ranked in A-Tier during Anniversary Season 2. This class is built around survivability and burst damage. Arms is the dominant specialization in PvP: unmatched pressure and tunneling of opponents throughout the entire fight. This guide covers everything in detail: race selection, talent distribution, a full set of the best gear, optimal compositions, match tips, and advanced mechanics. If you would rather skip the grind, our TBC arena boost team can boost your rating and gear you up.
Warrior PvP at a Glance — TBC Anniversary Season 2
Best PvP Warrior Races in TBC Anniversary Season 2
In the Arena, racial abilities can be the difference between a win and a loss.
Gnome — Best Race Overall
- Gnome is top-tier for its Escape Artist ability to break snares, especially when playing with classes that can’t dispel magic like Druids or Shamans.
Orc & Tauren
- Orc provides invaluable passive stun resistance Hardiness and an AP buff Blood Fury.
- Tauren is an amazing choice for War/Druid or War/Shaman comps, using War Stomp to peel for healers or lock down targets.
Top PvP Warrior Spec & Talents
Specialization 41/17/3 is the gold standard for PvP in TBC Anniversary: Arms, centered around the pressure and healing reduction of Mortal Strike. Setting up an Arms build for Season 2 requires a standard framework that stays mandatory if you want to compete on the ladder — but your weapon spec dictates everything.
You cannot afford to skimp on the basic toolkit foundations like Mortal Strike, Second Wind, and Tactical Mastery. These are your bread-and-butter mechanics for staying alive while managing stance-dance pressure.
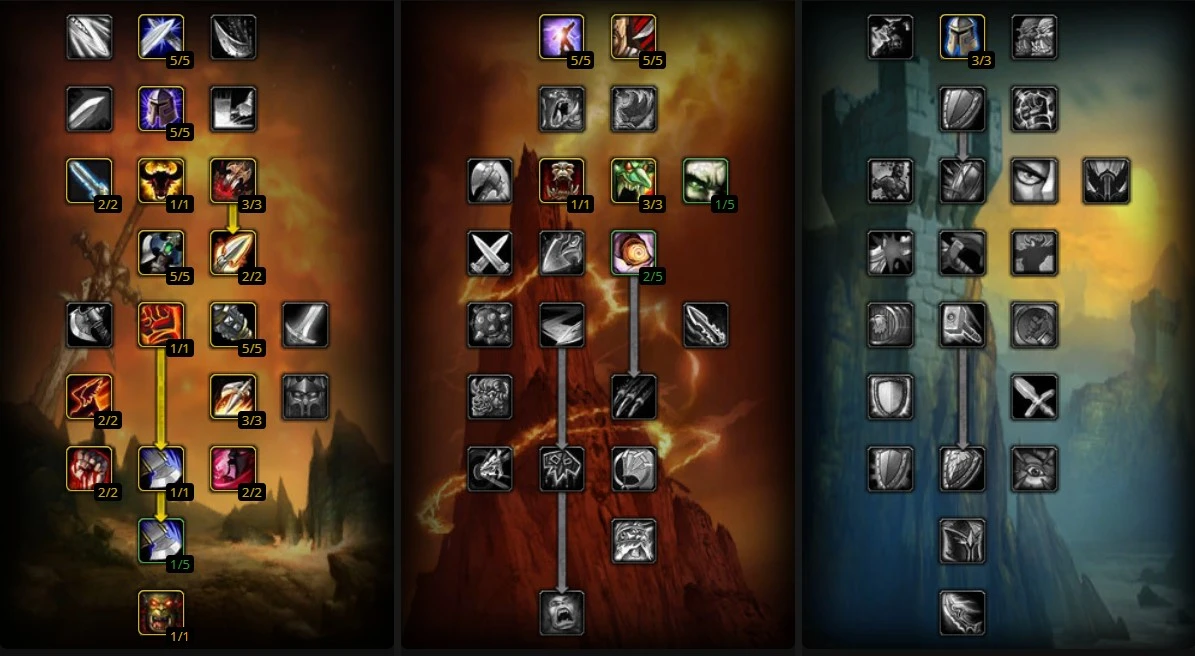
1. Mace Build — 41 / 17 / 3 (Standard PvP, Stormherald)
 ⤢ Click to enlarge
Based on actual practice, the tier-3 blacksmithing mace weapon, Stormherald, is undisputed Best-in-Slot for Season 2 PvP. The raw weapon damage profile alone is terrifying, but the real filth comes from stacking its built-in stun effect with your talent points.
These random mace stuns completely bypass standard crowd control rules. They happen passively, disrupting enemy healer cast bars and forcing panic defensive cooldowns without you having to spend a single point of rage. If you aren’t spec’d into maces while swinging this hammer on the ladder, you are fundamentally playing the class wrong.
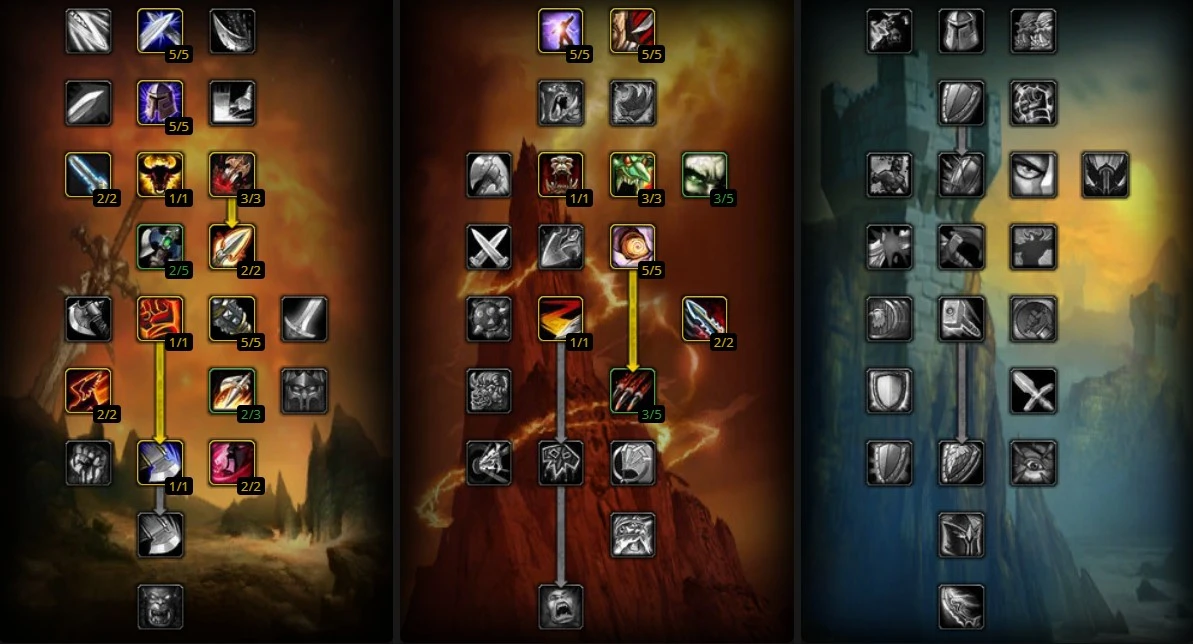
2. Sword Build — 41 / 17 / 3 (Twinblade of the Phoenix Alternative)
 ⤢ Click to enlarge
If you go this route, you must drop your mace talents and max out Sword Specialization instead. Based on actual practice, swapping to a sword trades the defensive, disruptive control of mace stuns for raw, explosive RNG burst damage. When that extra sword proc triggers back-to-back with a critical strike, you can delete an enemy health bar out of absolutely nowhere.
3. Sweeping Strikes Build — 33 / 28 / 0 (Battlegrounds & 5v5)
 ⤢ Click to enlarge
In massive team brawls, players constantly cluster together at choke points or around pillars. Popping this talent allows your massive physical strikes to cleave onto secondary targets simultaneously. From what you can see in-game, combining this with a broad weapon proc inside a crowded 5v5 opener generates absolute chaos, applying overwhelming pressure to the enemy healers right out of the gate.
Key Talents
- Mortal Strike — your primary instant attack and the sole reason Arms is mandatory in arena. It applies a 50% healing reduction debuff to the target. You press this on cooldown to choke out the enemy healer’s output and create permanent kill pressure.
- Second Wind — generates 20 rage and heals you for 10% of your total health over 10 seconds whenever you are stunned or immobilized. This passive carries your baseline survivability. It passively counters Rogue control chains and Frost Mage roots by feeding you free resources and health while you are locked down.
- Tactical Mastery — retains up to 25 rage when you swap stances. You cannot play a Warrior without this. It allows you to seamlessly stance-dance into Defensive Stance for Spell Reflection and Disarm, or Berserker Stance for Pummel and Intercept, without starving your rage pool.
- Mace Specialization — gives your melee attacks a flat chance to stun the target for 3 seconds. When paired with Stormherald, this creates overlapping, unpredictable stuns that do not share standard diminishing returns. It shatters enemy cast bars and ruins their positioning organically.
- Death Wish — makes you immune to Fear effects and boosts your physical damage by 20%, at the cost of taking more damage. This is your absolute trump card for breaking Warlock or Priest crowd control chains and immediately flipping the momentum into a massive burst window.
- Piercing Howl — an instant, spammable AoE shout that dazes all nearby enemies, slowing their movement speed by 50% for 6 seconds. Essential for peeling melee cleaves off your healer, catching a kiting Druid, or flushing out a stealthing Rogue before they get a clean opener.
- Improved Hamstring — gives your standard Hamstring a 15% chance to completely root the target in place for 5 seconds. This random proc is an absolute nightmare for highly mobile classes. It completely traps Druids trying to shift away and forces panic trinkets from targets trying to pillar-hump.
- Blood Frenzy — increases all physical damage caused to the target by 4% after applying Rend or Deep Wounds. A flat, passive damage multiplier that permanently buffs your overall output and heavily empowers any physical damage partners like Rogues or Hunters in 3v3 and 5v5 brackets.
Professions
- Blacksmithing is the most profitable profession and the best choice for Arms Warriors in PvP in the TBC Anniversary expansion, since it allows you to craft the top-tier BiS weapon — Stormherald.
- Second profession — Mining. It lets you save a lot of gold — as a beginner blacksmith you can mine ore yourself and won’t have to spend money to level up the profession. You can also always sell any extra ore for gold at the Auction House.
Warrior PvP BiS Gear — Season 2
Stat Priority
Arms Warriors absolutely need to reach the 5% hit cap for PvP in TBC Anniversary. This is the absolute highest priority. Missing a crucial Pummel or whiffing a Mortal Strike because you skimped on hit rating is literally the difference between winning and losing a game.
Once capped on hit, you need resilience to actually survive the opener. For an Arms Warrior getting focused in 3s or running heavy melee comps, aim for somewhere in the 300–400 range. Around 300–350 is generally plenty for a DPS class before it starts aggressively eating into your overall damage output.
After the hit cap and survival baseline are met, dump everything into Strength and Attack Power. Every gold spent on enchants and remaining sockets should go directly toward increasing raw damage.
BiS List
| Slot | Item | Benefit | Source |
|---|---|---|---|
| Head | Merciless Gladiator’s Plate Helm BiS | BiS piece | Arena Season 2 |
| Neck | Veteran’s Pendant of Triumph BiS | BiS PvP piece | Honor & Marks |
| Shoulder | Merciless Gladiator’s Plate Shoulders BiS | Gem socket and Greater Inscription of the Blade | Arena Season 2 |
| Back | Sergeant’s Heavy Cloak or Thalassian Wildercloak | BiS PvP piece / good PvE alternative | Honor & Marks / Kael’thas Sunstrider |
| Chest | Merciless Gladiator’s Plate Chestpiece BiS | BiS PvP piece | Arena Season 2 |
| Wrist | Veteran’s Plate Bracers BiS | BiS PvP piece | Honor & Marks |
| Hands | Merciless Gladiator’s Plate Gauntlets BiS | BiS PvP piece | Arena Season 2 |
| Waist | Veteran’s Plate Belt BiS | BiS PvP piece | Honor & Marks |
| Legs | Merciless Gladiator’s Plate Legguards BiS | BiS PvP piece | Arena Season 2 |
| Feet | Veteran’s Plate Greaves BiS | BiS PvP piece | Arena Season 2 |
| Ring 1 | Veteran’s Band of Triumph BiS | BiS PvP piece | Honor & Marks |
| Ring 2 | Ring of a Thousand Marks | Strong PvE finger for Arms — high AP and hit rating | Prince Malchezaar |
| Trinket 1 | Medallion of the Horde / Medallion of the Alliance | A must-have trinket to break crowd control in TBC Anniversary PvP | Honor Points |
| Trinket 2 | Bloodlust Brooch BiS | BiS trinket from S1 | x41 Badge of Justice |
| 2H Weapon | Stormherald BiS | BiS weapon for Arms — must-have with Mace Specialization | Blacksmithing |
| Ranged | Gladiator’s War Edge | Best-in-slot thrown — resilience and offensive stats | Arena Season 2 |
Best Warrior Comps in TBC Anniversary Season 2
2v2 Comps
Tier order for Warrior 2v2 in TBC Anniversary S2, strongest first:
WD — Warrior / Resto Druid S-tier — Best 2v2
The absolute top-tier setup for Arms in Season 2. The Druid provides incredible healing throughput and manages mana efficiently enough to carry you through deep dampening. The major drawback? You have zero offensive purges or defensive dispels. Games will absolutely drag on, and you are going to sit in a lot of magical crowd control while your Druid humps a pillar. If you are pushing for a Multi-R1 title or consistently managing high-end arena carries, this is your safest, most reliable workhorse comp.
WP — Warrior / Disc Priest High tier — Aggressive (Alliance)
The second-best 2v2 composition on the ladder if you play an Alliance faction (Dwarf + Dwarf). Unlike the slow grind of a Druid team, this is a highly offensive pairing that absolutely dismantles Mage setups. You get full access to offensive Purge and defensive Dispel Magic, meaning you spend way less time sitting in Frost Nova roots and more time swinging your weapon. Games are drastically faster and much more explosive than WD.
WSH — Warrior / Resto Shaman High tier — Aggressive (Horde)
If your faction is the Horde (Orc + Orc), the second-best 2v2 composition is a Warrior–Shaman duo. Thanks to Bloodlust and Windfury Totem, the Warrior will deal truly devastating damage. The Shaman also has Kick. The most important thing is to kill the enemy before your Shaman runs out of mana and Bloodlust wears off.
3v3 Comps
Tier order for Warrior 3v3 in TBC Anniversary S2:
WLD — Warrior / SL Warlock / Resto Druid Legendary — Supreme Survivability
Often referred to by veterans as one of the best and most durable 3v3 teams for Warriors in all of TBC. Both the Warrior and the Warlock bring massive baseline durability, backed up by the supreme healing of a Resto Druid. You get overwhelming sustained rot damage paired with excellent cross-map crowd control. It outlasts almost everything on the ladder.
WMP — Warrior / Frost Mage / Disc Priest Strong — Control Heavy
A classic, high-pressure setup. You get an overwhelming amount of crowd control by layering the Mage’s Polymorph with the Priest’s Psychic Scream. Add in the Mage’s Counterspell silence and your sheer physical burst damage, and you create massive, unhealable pressure windows that force panic cooldowns instantly.
Turbo Cleave — Warrior / Enhance Shaman / Healer Explosive — Fast Paced
Pure, unadulterated aggression. You lack complex crowd control chains, but you frankly do not need them. The entire game plan revolves around popping the Shaman’s Bloodlust and spamming offensive Purge on the kill target. The main goal is simple: overwhelm the enemy healer and secure the kill while the Bloodlust buff is active.
Melee Cleave — Warrior / Ret Paladin / Healer Strong Burst
A brutal double-melee setup (with a Disc Priest or Resto Druid) that severely punishes poorly positioned casters. You get surprisingly strong, hard-locked control chains by linking the Paladin’s Hammer of Justice directly into Repentance. When the Paladin connects with their holy burst alongside your Mortal Strike debuff, targets simply vanish.
Warrior PvP Matchups
Warrior matchups in TBC arena come down to one thing far more than any scripted sequence: maintaining 100% uptime on your healing reduction and ruthlessly managing your rage bar. There is no fixed “kill order” that works every game — the right target changes with enemy positioning, healer mana, and who is currently caught out of position without defensive cooldowns.
General priorities that hold across the common S2 setups:
- Versus double-caster (Mage/Priest, RMP setups): respect the opening crowd control, camp in Defensive Stance when you are the primary target, pre-bind your shield to predict major spell casts with Spell Reflection, and use Intercept to bypass slow zones and close the gap instantly. Against these Mage setups, only attack the nearest target — never try to chase a single target, since you are constantly caught in Nova and other slows and there’s no point wasting time.
- Versus a healer comp (Rogue/Druid, mirror WD): keep movement slows locked on the kill target, drag them behind pillars to force the enemy healer into terrible positions, and use focus-macros for Pummel or Intimidating Shout to disrupt the healer’s recovery casts.
- Versus Hunters: do not blindly chase them through Frost Traps and endless kiting loops — hit their pet to farm free rage, pressure their healer instead, and only swap back to the Hunter when they overextend or waste Deterrence.
- Mirror (Warrior comps): Mortal Strike uptime and stance discipline decide it. Use Disarm the exact second the enemy Warrior pops Death Wish, land your own weapon stuns first, and keep your shield ready to swap the moment your own healer gets locked in a crowd control chain. Another great tactic is to spam Sunder to weaken the enemy Warrior’s armor and then just tunnel him.
Warrior PvP Tips & Mechanics
Opener & Stances
- Charge. Always look to start the match with Charge in Battle Stance. This awards you vital initial rage and completely preserves your Intercept cooldown, keeping you highly mobile through the critical opening minute. Charge can only be activated if you are completely out of combat.
- Fight in Berserker, survive in Defensive. The vast majority of an arena match should be played in Berserker Stance to maximize your raw damage output, white swings, and access to burst abilities. Only drop to Defensive Stance when you are actively being focused by heavy physical cleaves or need to mitigate incoming spell pressure.
- Execute. Arms relies on heavy armor and bone-crushing physical damage to play an ultra-aggressive game. Keep a relentless offensive pace, and the exact second an enemy’s health bar dips below 20%, immediately burn them down with Execute.
Movement & Support
- As a pure melee spec, your primary task is maintaining zero gap between you and your opponent to maximize damage pressure and physically disrupt their ranged casting setups. Coordinate closely with your teammates to use movement slows or your partner’s crowd control to keep targets pinned down in the open.
- Intervene defensively. Do not treat Intervene as a mere escape tool to slide away from a bad fight. Use it dynamically to protect your arena partners. By tracking the enemy’s targeting frames, you can clutch-Intervene your teammate to physically intercept high-impact crowd control spells like Hunter Freezing Traps, Rogue Blinds, or out-of-combat Saps.
Rage & Cooldown Management
- Time your burst windows. Never fire your major offensive cooldowns blindly into an opponent who is fully prepared to handle them. If you pop your burst into active enemy defenses, it will simply be peeled or interrupted. Wait until the enemy team is completely caught off guard or trapped without a fallback option, then deploy your offensive window to fold them in half.
- The stun-to-disarm chain. Trying to land a raw Disarm into the face of an active melee player is an unnecessary gamble due to base dodge and parry stats. Always time your Disarm immediately after a Charge or Intercept. The micro-stun from these movement tools guarantees the target is incapacitated, ensuring your Disarm lands flawlessly without any risk of being dodged or parried.
Advanced Tactics
- Team-wide focus coordination. Arena PvP is entirely a team-based sport. Maintain constant voice communication with your team to cleanly coordinate focus targets. Keep your allies actively updated on low-health targets to execute swift switches, and regularly cycle your supportive shouts to keep your team’s survivability high.
- Master enemy CC tracking. You must develop a comprehensive knowledge of every single stun, fear, polymorph, and silence mechanic available to all opposing classes. Elite arena play as an Arms Warrior requires you to explicitly track every enemy control option so you can predict their setups and counter them before they land.